Nowadays, most of servers have been virtualized and I can't imagine work without vMotion in my datacenter. Using vMotion, I can move (migrate) VMs between ESXi hosts without interruption.
Increasing configured RAM of VMs causes vMotion needs time to be completed. So in this article we discuss how to improve/speed up vMotion.
Best Practices for vMotion Networking:
- Dedicate at least one gigabit ethernet adapter for vMotion
- Provision at least one additional physical NIC as a failover NIC
- vMotion traffic should not be routed, as this may cause latency issues
We can speed up vMotion by various ways:
10Gbit network
The easiest way to accelerate vMotion is using 10Gbit connection. This method provides not only better bandwidth but also more concurrent vMotions. If a vMotion is configured with a 1GB line speed, it is possible four concurrent vMotion, while with a 10GB link speed - eight concurrent vMotions per host. Dedicated 10Gbit links just for vMotion are not often scenario, so if you have a Distributed Switch, you can use Network IO Control (NetIOC) to prioritize vMotion traffic.
Distributed Switch and LACPv2
If you are an administrator of VMware infrastructure with Enterprise Plus license installed, you are lucky. Enterprise + lets you use all features such Distributed Switch (VMware or Cisco Nexus 1000v). Why is it useful for vMotion? Distributed switch supports the Link Aggregation Control Protocol (LACP) (since version 5.1) or LACPv2 (since version 5.5). LACPv2 lets you use following balancing alghoritms:
- Destination IP address
- Destination IP address and TCP/UDP port
- Destination IP address and VLAN
- Destination IP address, TCP/UDP port and VLAN
- Destination MAC address
- Destination TCP/UDP port
- Source IP address
- Source IP address and TCP/UDP port
- Source IP address and VLAN
- Source IP address, TCP/UDP port and VLAN
- Source MAC address
- Source TCP/UDP port
- Source and destination IP address
- Source and destination IP address and TCP/UDP port
- Source and destination IP address and VLAN
- Source and destination IP address, TCP/UDP port and VLAN
- Source and destination MAC address
- Source and destination TCP/UDP port
- Source port ID
- VLAN
Distributed Switch in vSphere 5.1 supports only one algorithm:
- Source and destination IP address
Pros:
- Even if you have two hosts VMware cluster with Distributed Switch 5.5 configured (LACPv2), two or more vMotions (running at the same time) between two ESXi hosts should use two or more uplinks (one uplink per vMotion).
Cons:
- Required Enterprise Plus license
- LACPv2 should be supported by Physical Switch
Standard Switch (vSwitch) and Etherchannel
If your VMware hosts are licensed lower than Ent+, you can speed up vMotion by using static Etherchannel. It provides fault-tolerance and high-speed links between switches and servers by grouping two to eight physical Ethernet links to create a logical Ethernet link with additional failover links.
Pros:
- Any ESXi license is supported
- Easy to configure
Cons:
- It supports only Source and Destination IP address (hash). Example, two vMotions between ESXi A and ESXi B would use the same one uplink because IP Source and IP Destination are the same.
Multi-NIC vMotion
Multi-NIC vMotion was introduced in vSphere 5.0. This feature provides load balancing the vMotion network traffic over multiple network adapters. It means that one vMotion session is balanced between all available vmknic.
Let's assume that we have two ESXi hosts and we want to migrate a VM with 512GB RAM configured. To show how Multi-NIC vMotion exactly works, there are below two scenarios: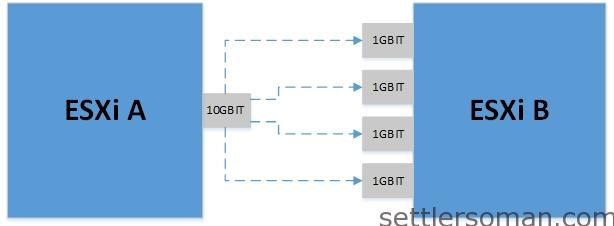 The scenario A: Host A with 1 x 10Gbit NIC and Host B with 4 x 1Gbit NICs
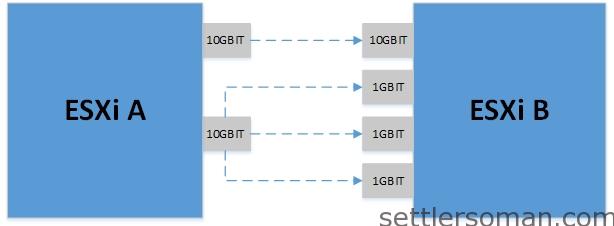 The scenario B: Host A with 2 x 10Gbit NICs and Host B with 1 x 10Gbit and 3 x 1 Gbit NICs
When a migration is initiated, VMkernel will pair source and destination vMotion NICs based on link speed, pairing multiple NICs to a single NIC as needed to fully utilize the link. VMkernel opens a TCP connection per network adapter pair and transparently load balances the migration traffic over all the connections.
In scenario A, VMkernel will pair the first 10GbE NIC on the ESXi A host with the four 1GbE NICs on the ESXi B host, thereby resulting in a total of four TCP connections.
In scenario B, VMkernel will pair the first 10GbE NIC on the ESXi A host with the sole 10GbE NIC on the ESXi B host, then VMkernel will pair the second 10GbE NIC on the ESXi A host with the three 1GbE NICs on the ESXi B host, thereby resulting in a total of four TCP connections.
Pros:
- No special license required
- Easy to configure
Cons:
- None 🙂
To configure Multi-NIC vMotion, please follow steps mentioned in post here.
Even you have Distributed Switch, I recommend to use Multi-NIC vMotion. If you use vSwitch and vDS, VMkernel port group may be present on a standard switch and the other one on a distributed switch.
Configuration Multi-NIC vMotion with Cisco Nexus 1000v requires some steps mentioned in my another article here.
Conclusion
I used to configure Static Etherchannel to improve vMotion till release of vSphere 5.0 and introduce of Multi-NIC vMotion. Nowadays, almost my VMware designs are based on Multi-NIC vMotion. It's simple to configure and works perfect without additional hardware requirements and costs.